


This tutorial will show you how to add your own map called MyMap to the map selection in the create menu in World of Padman. Please note that this tutorial only works with World of Padman version 1.6 or higher. For further editing you will need a text editor and possibly an image editing program.
Creating an arena file
In order for the game to know which maps exist and which game modes they support, as well as providing further information, each map must be listed in a so-called arena file. In earlier versions before WoP 1.5 these files had the extension woparena. However, nothing has changed in terms of content. The name of this file can be chosen freely, because the game automatically loads all existing arena files and searches for information about the corresponding map. You should just make sure that you do not use any existing file names. A good name for the arena file would therefore be the name of your own map, in this case mymap.arena. If you want to combine several map files into one PK3 file, for example different variations of your map for different game types, you can also list them by multiple entries in a single shared arena file. The file is saved under scripts/mymap.arena. The structure of the file content could be as follows:
{
 map         "mymap"
 longname    "^6My^1Map"
 type        "ffa team lps syc_ffa syc_tp"
}
{
 map         "mymapBB"
 longname    "^6My^1Map"
 type        "bb"
}
{
 map         "mymapCTL"
 longname    "^6My^1Map"
 type        "ctl"
}
The file name of the map must be assigned to the parameter map, in this case mymap, because the map itself is located under maps/mymap.bsp. This name is also displayed in the menu below the map when the mouse is hovered. The parameter longname is the actual, detailed name of the map and can be freely selected and contain color tags. It is also displayed below the map. The parameter type determines which game types the map supports. The map is only displayed in the menu if one of the game types defined here is selected in the create menu! The possible values here are:
- ffa – Free For All
- tourney – Tournament
- single – Singleplayer
- syc_ffa – Spray Your Color
- lps – Last Pad Standing
- team – Free For All Team
- ctl – Capture The Lolly
- syc_tp – Spray Your Color Team
- bb – Big Balloon
These are to be entered separated by a space. Please note that the BB redirect known from earlier versions was abolished with WoP 1.6, so now each BSP file needs a separate entry in the arena file. Furthermore there is no single player game type in World of Padman. For Tournament there is no entry to select from the create menu, but the game type itself is available. All other information that might be known from Quake 3 Arena like bots, timelimit etc. have no further meaning in WoP because of the missing Singleplayer game type. They can therefore simply be omitted.
Embedding level shots
Level shots are representative images of the map, which are displayed at different places in the game. But first of all a hint about the size of the level shots. For the sake of simplicity, these should correspond to the specifications in this tutorial, as this will give them the necessary minimum size, image format and the appropriate aspect ratio. Of course you can also use higher resolution images, but this may lead to longer loading times in the create menu. If the JPG format is used, the image should not be saved progressively and we recommend a compression between 94 and 98 percent. Image formats like TGA and PNG are also supported, but will increase the size of your PK3 file. If you reduce the size of the image material while creating the level shots, it can be useful to sharpen the result afterwards. For your map you need a total of three image files; a loading image, a selection image and a preview image.
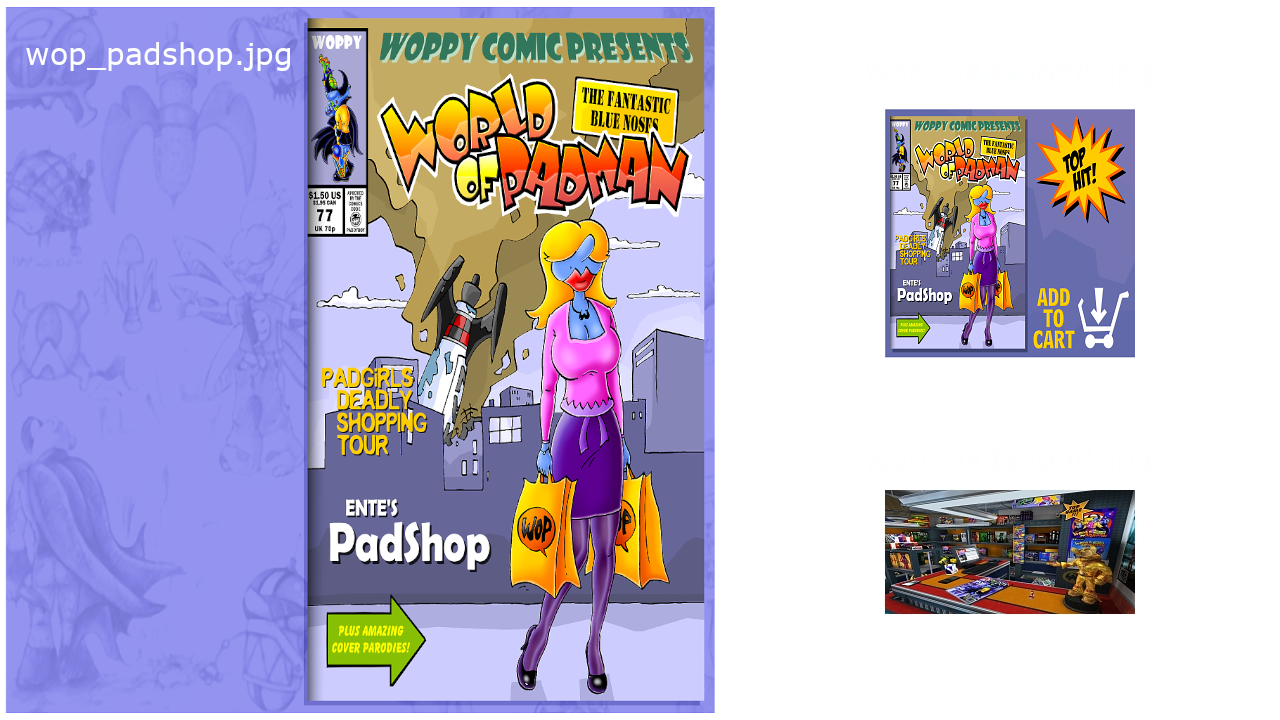
Loading image (left), selection image (top right) and preview image (bottom right) as saved
Loading image
The loading image is always displayed when the map is loaded. Please note at this point that since version 1.5 WoP uses the left part of the image to display the hints for the respective game type. This area should therefore be kept free. For further editing there is a useful image template levelshot_border.psd, which can be found under XTRAS/editing files in custom levelshot files.zip. Take a nice screenshot or otherwise become artistically active and insert the result as background into the template so that it appears on the title page of the WoP comic shown. Save the level shot in the JPG format 1024×1024 pxl (72dpi) under the name mymap.jpg. in the folder levelshots/ in the wop subdirectory. If the directory does not exist, you have to create it new. The aspect ratio of formerly 4:3 is then changed to 1:1, but is automatically corrected again in the game. If you do not create the loading image, a default image will be used in the menu for your map instead.
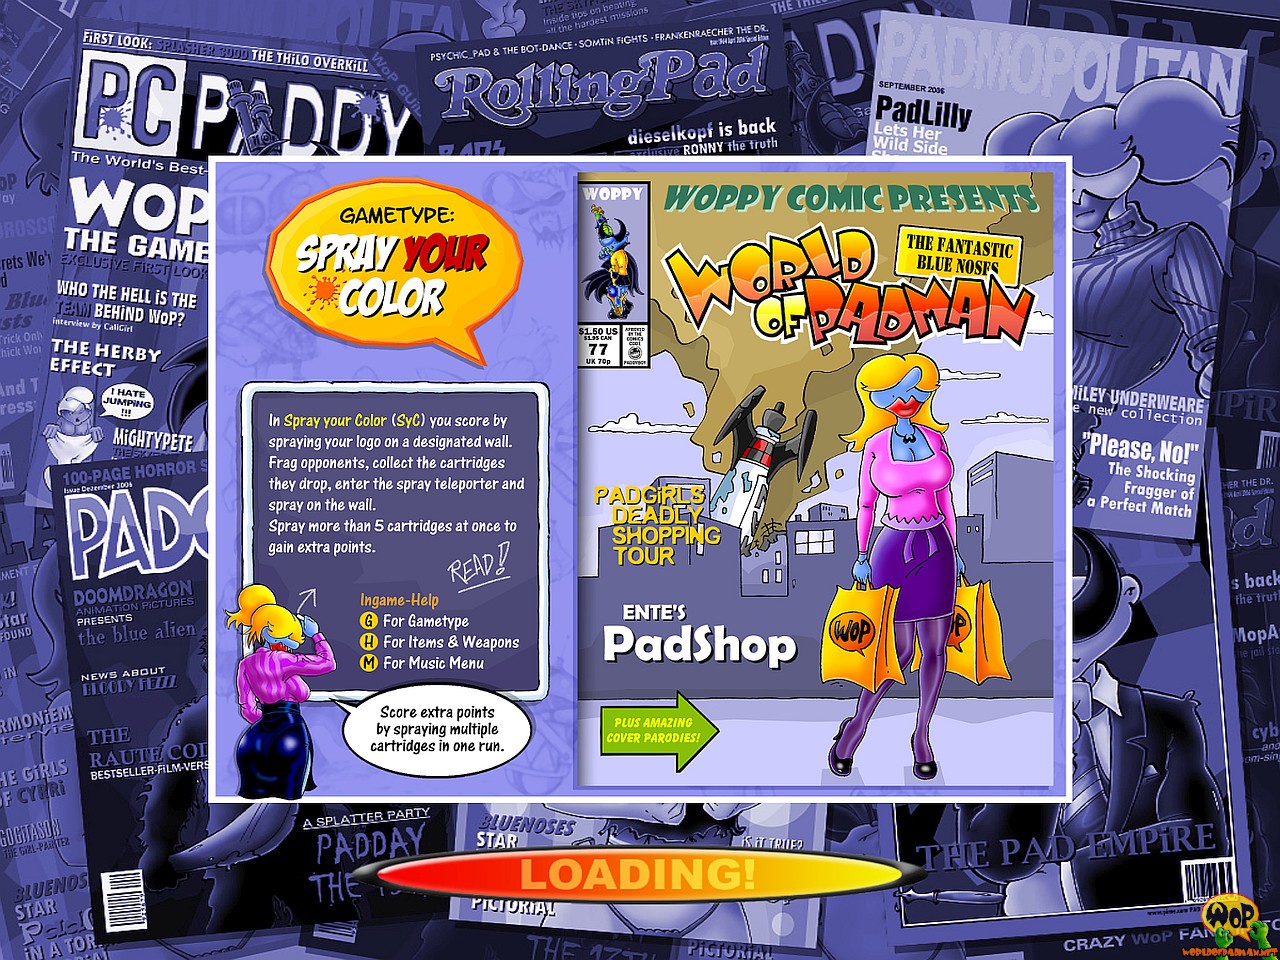
Loading image in-game
Selection image
Then there is the selection image that is displayed in the create menu for map selection. There is also a template add_to_card_border.jpg under XTRAS/editing files/ in custom levelshot files.zip. So again create an image of your choice and paste it into the white rectangle on the left side of the image. It is best to use the title page section from your loading image. Save the selection image under the name meinemapA.jpg in the folder levelshots/ in the wop subdirectory in JPG format 256×256 pxl (72dpi). The “A” at the end of the file name is important. The aspect ratio of formerly 4:3 is then changed to 1:1, but is automatically corrected again in the game. You can also omit the selection image, in which case the default loading image is used instead.
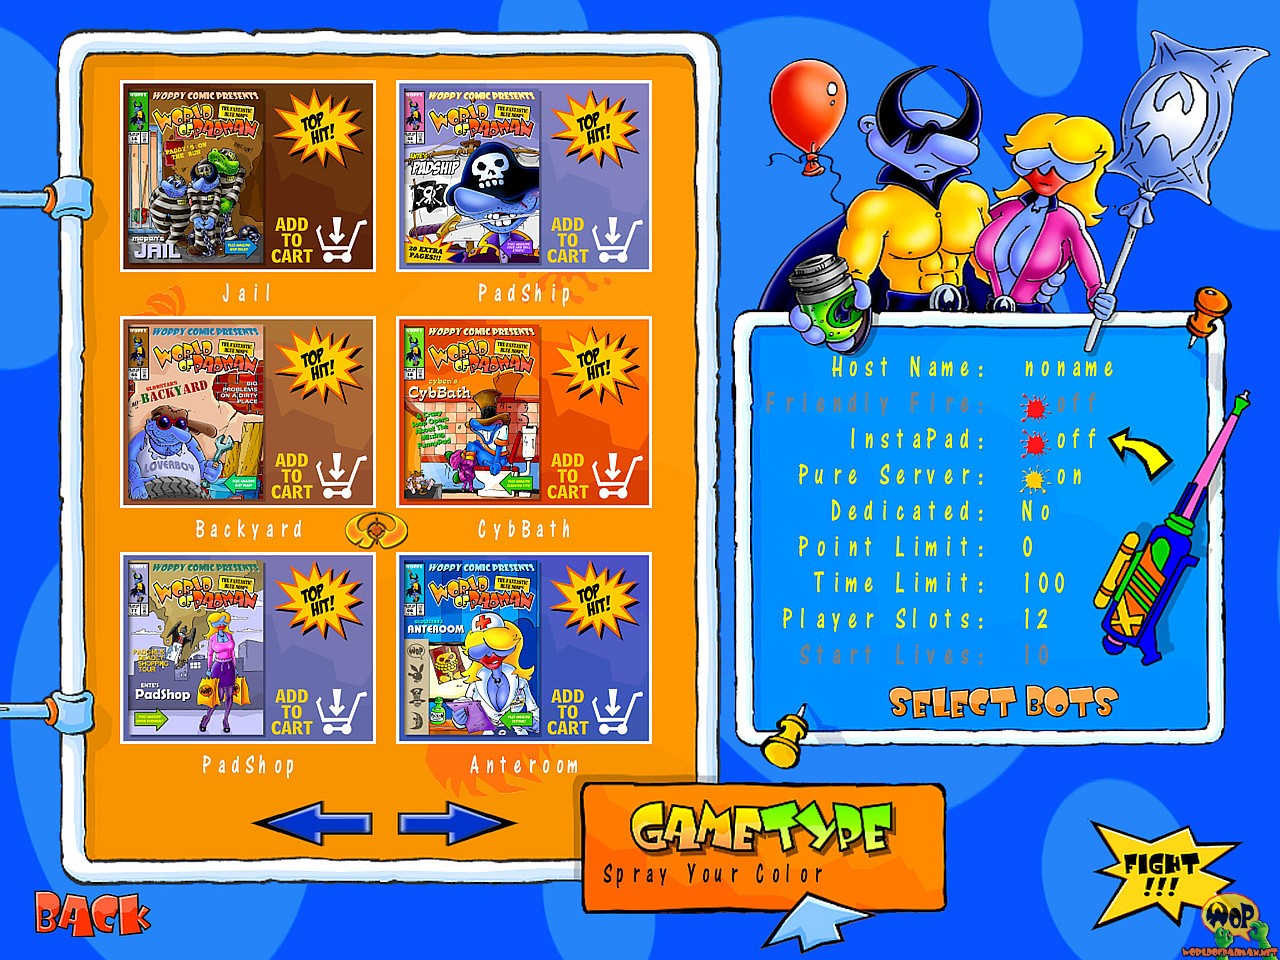
Selection image in the create menu in-game
Preview image
The last image in the bunch is the preview image and is displayed in the create menu when you move the mouse over the selection image of your map. There is no template for this, as it is usually a representative in-game screenshot of your map. You will find instructions below for creating screenshots. Save the screenshot under the name mymapB.jpg in JPG format in the size 256×128 pxl (72dpi) under levelshots/. The “B” at the end of the file name is important. The aspect ratio of formerly 4:3 is then changed to 2:1, but is automatically corrected again in the game. If the preview image is not available, the default loading image is also used.
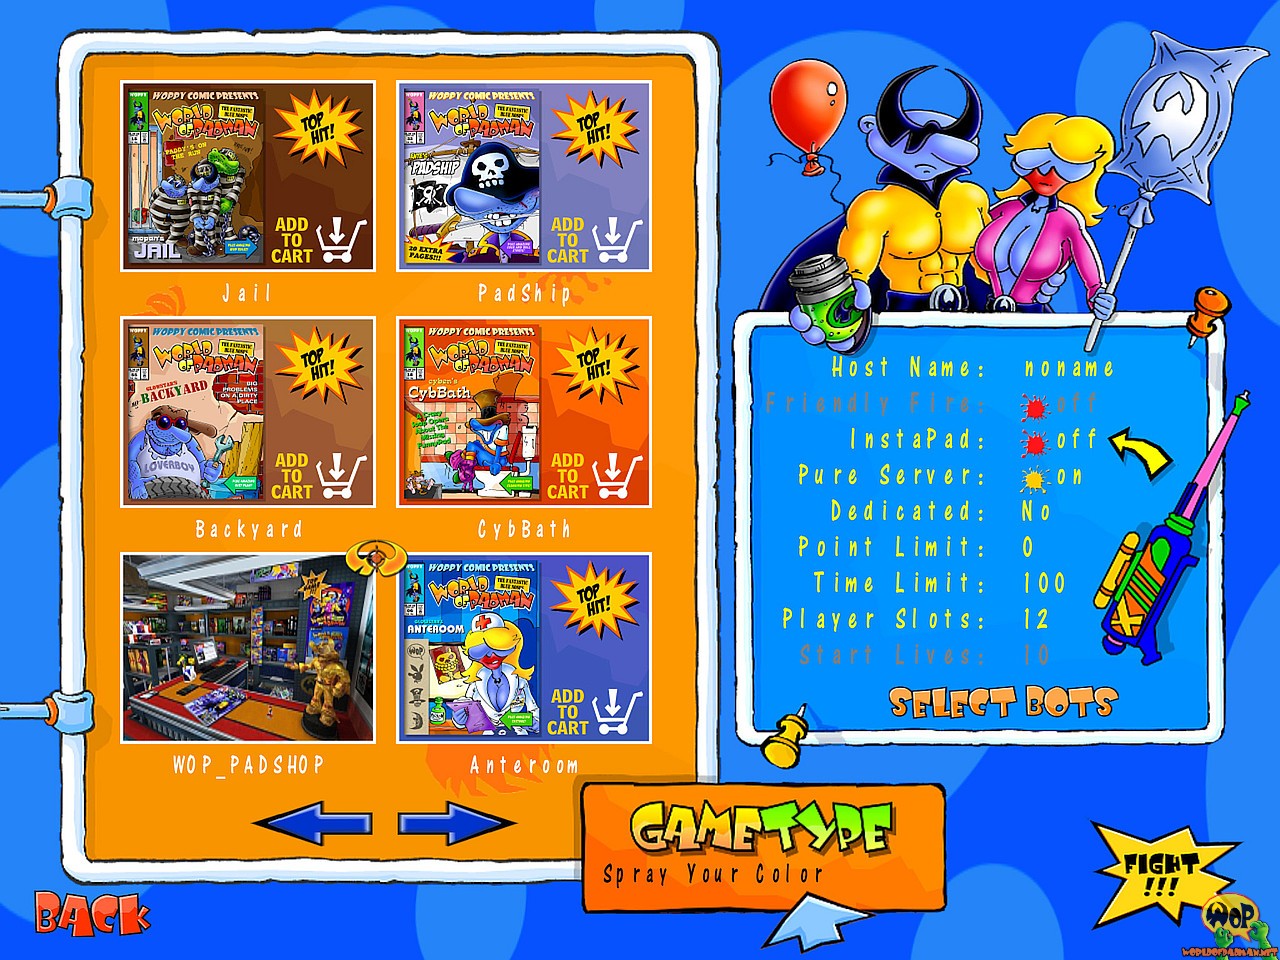
Preview image in the create menu in-game
Use the same level shots multiple times
If your map named mymap.bsp doesn’t support all game types within one file and you have created separate BSP files, e.g. mymapBB.bsp or mymapCTL.bsp, you could create separate level shots for them using the principle described above. For the BB version of your map this would be mymapBB.jpg, mymapBBA.jpg and mymapBBB.jpg and for the CTL version mymapCTL.jpg, mymapCTLA.jpg and mymapCTLB.jpg.
As an alternative you can also use the level shots of the normal map for these extra BSP files by referencing them via one or more shader entries. For Big Balloon, these can look as follows and are written in one line each for the sake of compactness:
levelshots/mymapBB { nomipmaps { map levelshots/mymap.tga } }
levelshots/mymapBBA { nomipmaps { map levelshots/mymapA.tga } }
levelshots/mymapBBB { nomipmaps { map levelshots/mymapB.tga } }
For Capture The Lolly the entries could look like the following and are here due to the more compact representation also written in one line each:
levelshots/mymapCTL { nomipmaps { map levelshots/mymap.tga } }
levelshots/mymapCTLA { nomipmaps { map levelshots/mymapA.tga } }
levelshots/mymapCTLB { nomipmaps { map levelshots/mymapB.tga } }
This alternative can significantly reduce your workload, eliminates the need to store redundant data and thus reduces the size of your PK3 file. But this only makes sense if your map variants do not differ too much in setting and level structure. Alternatively, you could use shaders to reference only a part of the level shots, e.g. loading image and selection image, while the preview image is actually a separate file and shows a different content. In any case, you must create a separate entry in the arena file for each of your BSP files, as described above.
Taking screen shots
The easiest way is to take self-created screen shots for the level shots. But even here there are some tricks to get a nice result. Of course it is up to you what you and how you capture something on the screen shot. But for a level shot it is best to present the map well. To do this, you should set the graphics options to the maximum that your computer can provide. Then load your map and look for a prominent place where you can easily recognize the map. Usually this is the starting point of the spectator, in whose role you can jump. Alternatively you can use the command noclip to float through walls etc. as a normal player (does not work as a spectator). In any case, you should use the WoP console to enter some commands. You open and close the console by typing the key combination Shift+Esc. Open the console and enter the following lines and confirm with the Enter key after each command.
/devmap mymap
/set cg_draw2d 0
/set cg_drawgun 0
/noclip
The example above loads your map mymap in developer mode, so cheats like noclip are allowed and work. cg_draw2d 0 disables all elements of the HUD while cg_drawgun 0 disables the display of the weapon. The noclip command in turn allows you to float through everything, so you can visit places that are otherwise inaccessible. But be aware of the unpleasant HOM effect (hall of mirror) that can occur when you are inside a brush or outside the envoronment box. The first two lines are actually enough if you are a spectator. The last two lines are useful when you move through your map as a player.
Now find the place for your screen shot and press F12. This is the default key assignment for a screenshot in JPG format. Remember to undo the settings by entering /set cg_draw2d 1 and /set cg_drawgun 1 from the console when you want to leave the map. You can find the screen shots you made under screenshots/ in the wop folder of your Padman user directory (Windows: C:\Users\YourUserName\AppData\Roaming\Padman\wop\ | Linux: ~./padman/wop/).