


In this tutorial I would like to show you how to create a light emitting texture with an already existing or self-made glare effect, a so-called flare. But before you start, you should make sure that you have installed and configured the Q3Map2 compiler at least in version 2.5.16 and the GtkRadiant 1.4 or newer for World of Padman. With older versions, you may encounter errors when using this tutorial.
General information about flares
A flare is a type of glare effect that occurs around a light source due to scattering. For example, if you look directly into the light of a street lamp in the evening hours, you will notice a corona around the light source. This is caused by the scattering in the vitreous body of your eye. A high level of humidity can significantly increase this effect (e.g. fog). Flares have been used in computer games for a very long time. For example, in Unreal anno 1999 this glare effect was used very excessively. Thanks to ioquake3, on whose source code World of Padman is based, we are also able to use this feature and integrate it into our maps. There are two possibilities for this, which I would like to introduce to you. The first option, here I call it “dynamic” flare, uses the flare feature of the graphics engine. The second option, called “static” flare by me here, is actually just a trick to simulate a dynamic flare, but can be advantageous in certain situations. When it is advisable to use which option, you will find out in the following sections.
Embedding a dynamic flare
In this context, a dynamic flare is what I call the glare effect that changes in size and intensity when the distance of an observer to a light texture changes. The prerequisite for this is a texture that is supposed to emit light via the property of the corresponding shader, i.e. it should emit light and is only used to a limited extent on the surface. This type of flare is not very suitable for long, very large or multiple tiled light textures, because the glare effect is always automatically placed in the center of the texture.

Light texture without flare (left) and with “dynamic” flare (right)
Basis for the glare effect in World of Padman is a special flare texture flareb.tga, which can be found at textures/pad_gfx. This texture represents a circular corona, which is equipped with a corresponding shader pad_flare.shader to make it transparent in different intensities. The shader looks like this:
flareShader
{
   cull none
   {
      map textures/pad_gfx/flareb.tga
      blendFunc GL_ONE GL_ONE
      rgbGen vertex
   }
}
Theoretically you could also create your own glare effects based on this, using other textures. In any case, the name and path of your shader should be different from ours, so that you don’t overwrite ours by mistake! In the game itself the glare effect is always automatically placed over the center of the light texture. In order to use it, you must integrate it directly into the shader of your light texture. The shader of a texture that should emit light can look like this:
textures/mymap/mylight_100
{
   q3map_surfacelight 100
   q3map_flareShader flareShader
   q3map_lightRGB 0 0 1
   surfaceparm nolightmap
   {
      map textures/mymap/mylighttextur.tga
   }
}
A short description of the meaning of the individual shader lines:
textures/mymap/mylight_100
This is the path and name of the light texture shader. Later the shader is displayed in the Radiant in the directory mymap with the name mylight_100. For light textures you should always add how bright the light is. In this example the intensity is 100.
q3map_surfacelight 100
With the key q3map_surfacelight you can define how bright the emitted light should be. In this example the intensity is 100.
q3map_flareShader flareShader
With the key q3map_flareShader you can integrate the glare effect shader with the name flareShader. Here you could also specify the path and name of your own flare shader, if you have created one.
q3map_lightRGB 0 0 1
Additionally you can of course adjust the flare color to the emitted light color of your light texture by defining the three desired RGB color values (decimal values between 0 and 1) via the key q3map_lightRGB <Red> <Green> <Blue>. In the example a blue color is created here. If this key is omitted, the glare effect simply remains white.
Note: Usually, the color intensities in the RGB color scheme are specified with values between 0 and 255. However, the id-Tech3 graphics engine only processes decimal values, so you have to divide your RGB values by 255 to get decimal values. As an example, a color with the values 200 34 255 becomes 0.784 0.133 1.0. Please note the American notation with decimal point instead of the comma, i.e.: 0.784 0.133 1.0!
surfaceparm nolightmap
The parameter nolightmap describes a property of the texture and defines that it is not taken into account when compiling the lightmap. Ergo, no shadow can fall on the glare effect texture itself, which would also be useless.
map textures/mymap/mylighttextur.tga
With the parameter map you define the path to the texture that should emit the light. The texture does not have to be in TGA format, but in the shader must be tga!
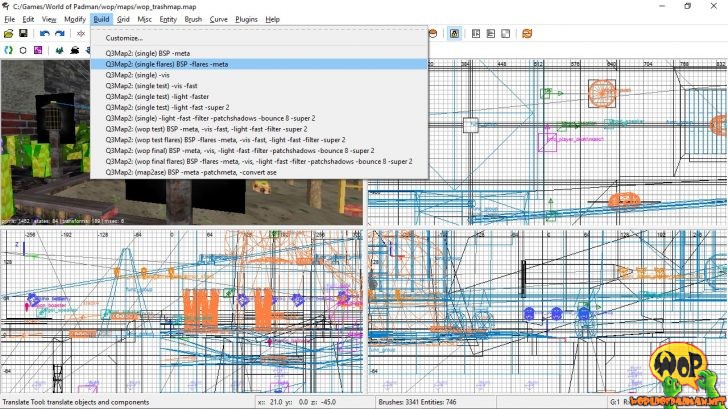
In order for the dynamic flare to work later in the map, the new parameter -flares in the BSP stage is required when compiling, which should be added directly after -meta. We have already added this parameter to the build menu of the GtkRadiants at the three places. So you can combine the BSP stage with subsequent stages of your choice using single flares, or you can have the map calculated in one go using wop test flares or wop final flares. If you use Q3Map2Build for compiling you have to mark the -flares parameter in the BSP stage additionally.
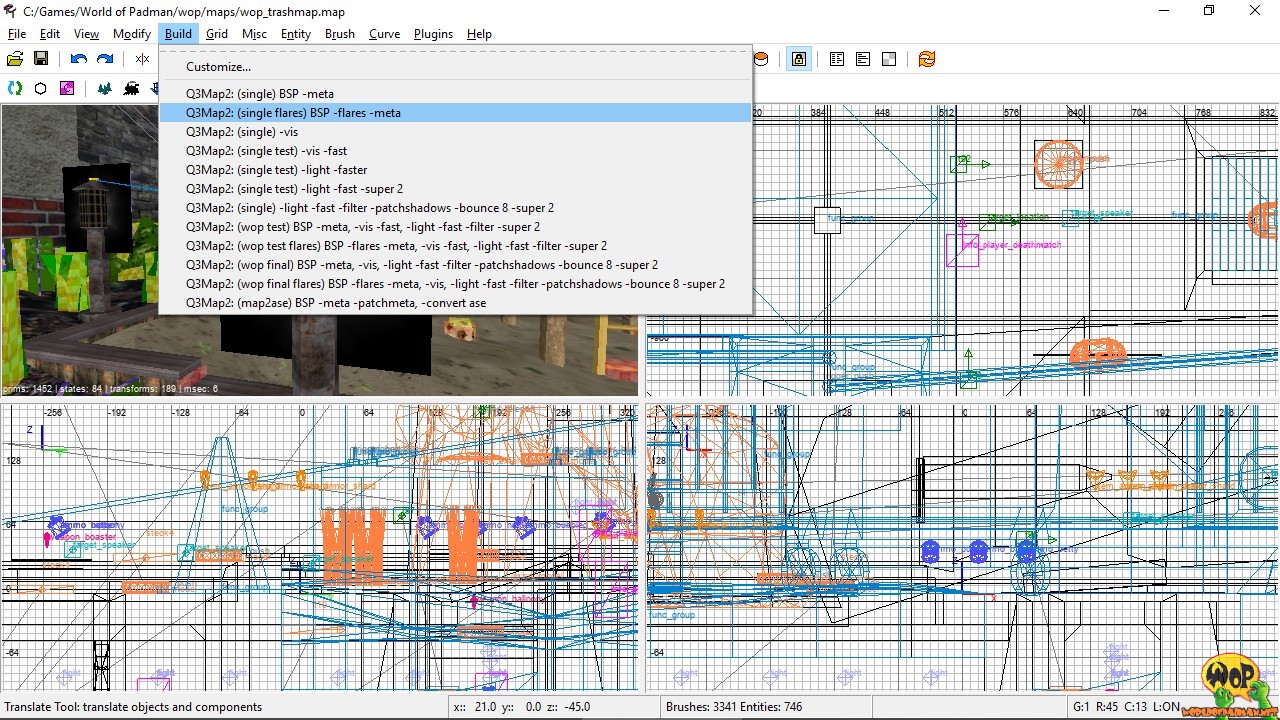
Build menu of NetRadiant with additional flare command lines
Embedding a static flare
At this point, we will discuss a traditional way of embedding a glare effect into a map. I want to call it a static flare here, because a static flare, in contrast to a dynamic flare, does not change in size and intensity when the player varies his distance to the light source. The static flare is based equally on a shader and a flare texture, but the flare texture is not called directly in the shader of the light-emitting texture. This makes it very flexible and usable in many situations. It is especially suitable for enhancing map objects and more complex brushwork that are supposed to act as light source in the game. The example shader shown below makes sure that the glare effect texture always points to the same side of the player’s position, in other words it rotates with the player (also called auto-sprite).
textures/mymap/mystaticlightflare
{
   deformVertexes autoSprite
   surfaceparm trans
   surfaceparm nomarks
   surfaceparm nolightmap
   {
      clampmap textures/mymap/myflaretextur.tga
      blendFunc add
   }
}
A short description of the meaning of the individual shader lines:
textures/mymap/mystaticflare
This is the path and name of the glare effect shader. Later the shader will be displayed in the Radiant in the directory mymap with the name mystaticflare.
deformVertexes autoSprite
The deformVertexes property with the value autoSprite makes sure that the corresponding texture always points with the same side to the player’s position, in other words it rotates with the player.
surfaceparm trans
The parameter trans defines the transparent property of the texture.
surfaceparm nomarks
The parameter nomarks describes a property of the texture and defines that projectiles (e.g. rockets) cannot leave impact marks.
surfaceparm nolightmap
The parameter nolightmap describes a property of the texture and defines that it is not taken into account when compiling the lightmap. Ergo, no shadow can fall on the glare effect texture itself, which would also be useless.
clampmap textures/mymap/myflaretextur.tga
With the parameter clampmap you define the path to the texture that should emit the light. In contrast to map, clampmap causes the texture to be scaled up or down exactly the size of the brush and therefore always fits. Even if it is shown tiled or scaled in the Radiant, it always takes the size of the brush in the game. The texture itself does not have to be in TGA format, but it must remain in the shader tga!
blendFunc add
The blendFunc defines to what extent the texture is blended with the texture behind it. add is the abbreviation for GL_ONE GL_ONE and ensures that the texture is blended additively with the background.
In order to implement a static flare, you need a square brush with the approximate dimensions that the flare will have later in the game. The brush should not exceed a thickness of one unit and all sides, except the side with the glare texture, must have the texture nodraw. Now the brush only needs to be positioned in the center of the light source. Since this is a simple texture you don’t need any additional parameters when compiling, unlike the dynamic flare.

“Static” flare in Radiant (left) and in game (right)