


In this tutorial I would like to show you how to use different footstep sounds in your map according to your textures. But before you start, you should make sure that you have installed and configured the Q3Map2 compiler at least version 2.5.16 and the GtkRadiant 1.4 or newer for World of Padman. With older versions, you may encounter errors when using this tutorial.
Footstep sounds
Quake 3 Arena offers only a limited number of footstep sounds by default. Besides the standard footstep sound, the key surfaceparm with the value metalsteps in the texture shader can be used to create an alternative, metallic footstep sound when the player walks over the corresponding texture. However, the advanced Q3Map2 compiler allows the level designers to include additional footstep sounds. Without equipping World of Padman with an unnecessarily complex material system right now, we have simply concentrated on expanding this range of footstep sounds. In addition to the standard footstep sound, WoP has seven more footstep sounds that can be integrated into your map in two different ways. In the following all supported footstep sound values for the key surfaceparm are listed and briefly described.
- carpetsteps – quiet footstep noise for carpets
- latticesteps – loud footstep noise for metal lattices
- metalsteps – loud footstep noise for metallic surfaces
- sandsteps – quiet footstep noise for sandy surfaces
- softsteps – very quiet footstep noise for soft surfaces, e.g. upholstered furniture
- woodsteps – loud footstep sound for wooden surfaces
- snowsteps – loud footstep sound for crunching snow
Using clip textures
If you want to avoid writing your own shaders for your textures you can use ready-made textures that already have the desired footstep sound. We have provided corresponding clip textures in the common directory.
- carpetclip for carpetsteps
- latticeclip for latticesteps
- metalclip for metalsteps
- sandclip for sandsteps
- softclip for softsteps
- woodclip for woodsteps
- snowclip for snowsteps
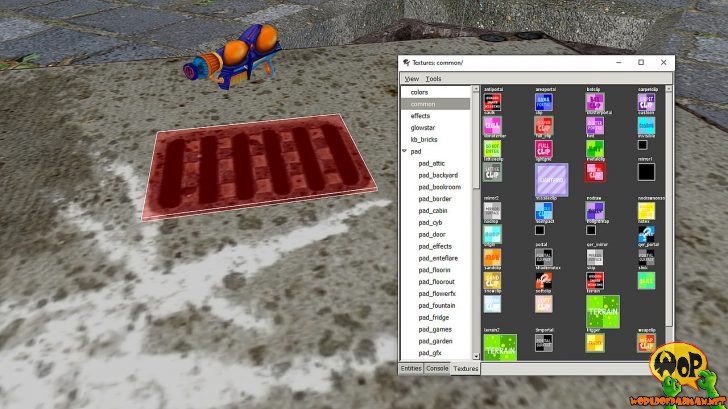
This supposedly easy way to implement individual footstep sounds in your own map can also turn out to be very time-consuming, as you have to cover all corresponding areas with an additional flat brush (1 unit high), whose surface is covered with the desired clip texture. This method is therefore only suitable if you want to add an alternative footstep sound to a small part of a texture. The following figure shows the concrete cover of a manhole in the Trashmap. There, an additional brush was created over the metal grid in the middle of the texture. The surface of this brush was covered with the texture common/metalclip.

Floor texture with metal clip texture in the partial area
Implementation via a texture shader
The best way to include alternative footstep sounds in your map is to put the key surfaceparm with a desired value directly into the shader of your texture. The additional effort is that textures that previously required no shader at all now need one. Such a shader for e.g. a snow texture with a sound of snow steps (value: snowsteps) could look like this:
textures/mymap/mysnowtexture
{
   qer_editorimage textures/mymap/mysnowtexture.tga
   surfaceparm snowsteps
   {
      map $lightmap
      rgbGen identity
   }
   {
      map textures/mymap/mysnowtexture.tga
      blendFunc GL_DST_COLOR GL_ZERO
      rgbGen identity
   }
}
The advantage is that you can now use the shaded texture as usual in Radiant. In the game it will then create the alternative footstep sound for the player when he walks over it. The disadvantage is that you can only assign one footstep sound to the texture. So this is only suitable for homogeneous textures without a material change.
If you want to use an already existing texture from World of Padman (e.g. a metal texture), which unfortunately did not get a shader with a metallic footstep sound, you can also write a new shader for it, which refers exactly to this WoP texture. But to not change the property of the texture globally, your shader should look like this.
textures/mymap/mymetaltexture
   {
      qer_editorimage textures/pad_texturedirectory/woptexture.tga
      surfaceparm metalsteps
   {
      map $lightmap
      rgbGen identity
   }
   {
      map textures/pad_texturedirectory/woptexture.tga
      blendFunc GL_DST_COLOR GL_ZERO
      rgbGen identity
   }
}
Notice the difference between the shader path and the texture path. This will cause the texture from WoP to be displayed in the texture directory of your map with the footstep sound you selected. So the shader only refers to the WoP texture in pad_texturedirectory and provides it with the properties you defined. So you can easily use this texture from WoP without having to copy it manually into your texture folder again. Additionally, our texture properties remain untouched. The important thing is that your shader has a unique shader path.
Notes on Q3Map2Build and Q3ASE
In order for the footstep sounds you have built into the game to work, you need the parameter -custinfoparms in BSP and LIGHT stage when compiling your map, which is best added directly before the parameter -meta. The required parameter has already been added by us in all commands in the build menu of the Radiant. If you use Q3Map2Build for compiling, you have to select the parameter additionally. The basic requirement is that the file custinfoparms.txt is located in the scripts directory. This text file is included in the WoP installation in the directory /XTRAS/editing files in the file WoP mapping files.zip and should already have been automatically unpacked into the correct directory when setting up the Radiant.
If you use the Q3A Shader Editor (Q3ASE) to create shader scripts, you should know the following. Unfortunately Q3ASE dies not know how to handle the footstep sound entries. If a shader is loaded with a new surfaceparm and saved again from Q3ASE, all unknown parameters are simply deleted from the shader script automatically and not saved again. Therefore changes to the shader should always be saved under a new name. You can then manually copy the desired modified parts of the shader into the old shader. This is often easier in terms of effort.