


In this tutorial I would like to show you how to add an existing lens reflection effect to the environment box of your map. But before you start, you should make sure that you have installed and configured the Q3Map2 compiler at least in version 2.5.16 and the GtkRadiant 1.4 or newer for World of Padman. With older versions, you may encounter errors when using this tutorial.
Lens reflections in World of Padman
Lens flare is the visible reflection and scattering of light from a point light source in a lens system. While the occurrence of lens flare is often perceived as disturbing in photography, this effect is deliberately used in computer games. It is supposed to contribute to optical embellishment, although for the player there is actually no lens system at all, hence the effect cannot occur at all. In reality, the shape of the lens reflection can be star-shaped, ring-shaped or circular and the colouring can vary greatly. Basically, the occurrence at the affected areas leads to a reduction of the chromatic contrast.
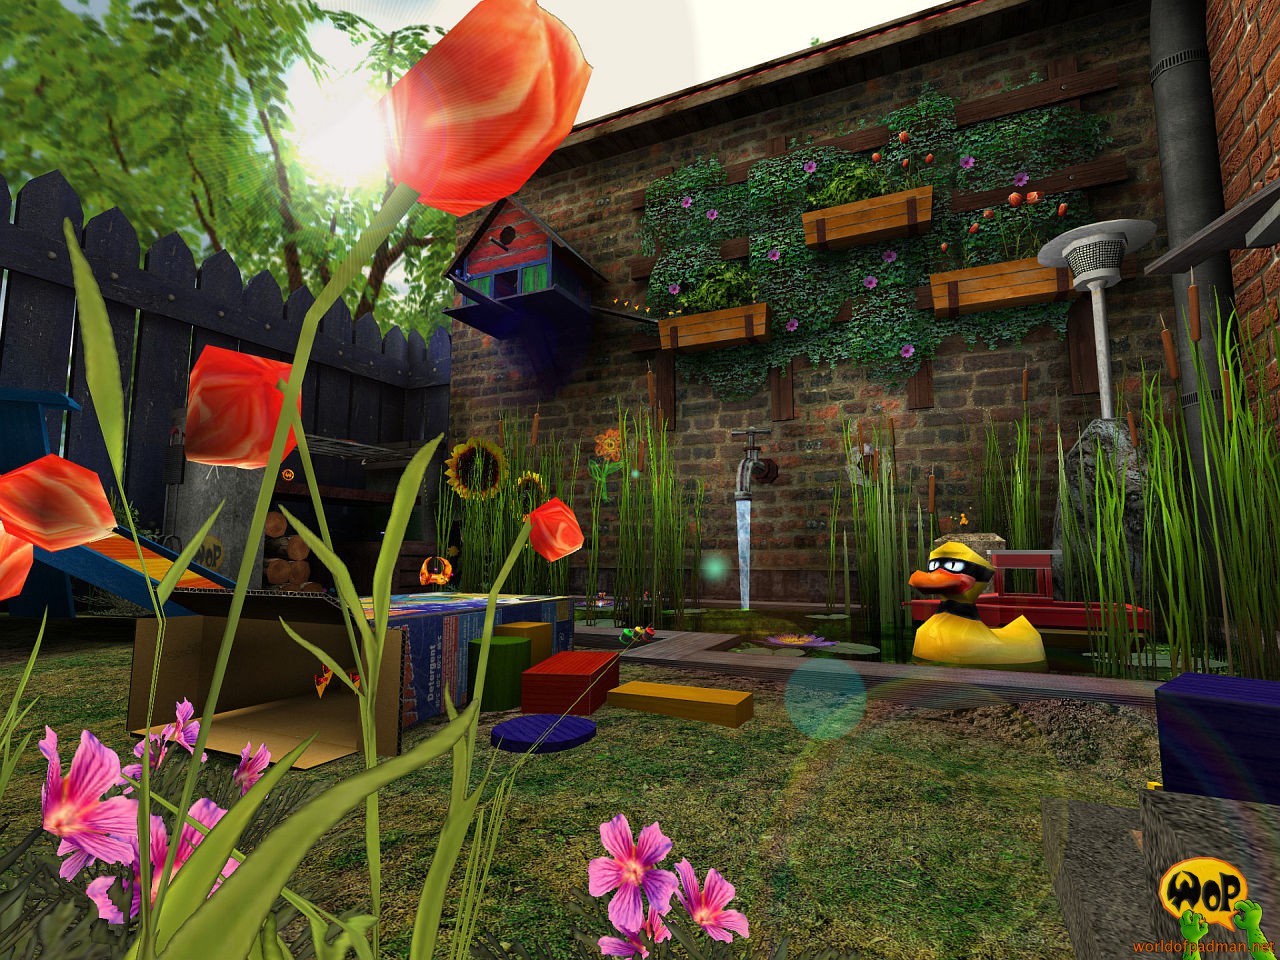
Lens reflection effect of the environment box in ENTE’s PadGarden
World of Padman has its own system for displaying lens reflections, which was implemented by our coder #@ (raute). The possibilities of this system can be very complex, so in the following I will limit myself to the integration of a lens reflection effect already existing in WoP. For more detailed information I refer to the documentation of #@.
All lens reflections are implemented in WoP by script. So far all mappers of the WoP team use the same lens reflection effect Photoshop/50-300mmZoom for all environment boxes that have a bright day sky and allow a direct view of a point light source, like the sun. The corresponding script file is called photoshop.lensflare and is located in the subdirectory scripts. This naming came about because the textures for the effect were created with Photoshop at that time.
Embedding the lens flare script
First you have to enter two keys in the worldspawn of your map. You can do this in GtkRadiant 1.4 by simply pressing the N key without selecting anything first, which opens the Entities Inspector. In GtkRadiant 1.5 or NetRadiant 1.5, you must first select a brush of the worldspawn before you open the Entities Inspector. Add the named values for the following keys:
skylensflare       Photoshop/50-300mmZoom
skylensflare_dir   -0.463591927 -0.324418826 0.927183854
The key skylensflare requires here, as already known from shaders, the path in the script file, here Photoshop/50-300mmZoom, not the path or file name of the script (here: photoshop.lensflare)! The key skylensflare_dir requires the specification of coordinates that define the position of the point light source, such as the sun, on the environment box. The values above are taken from the TrashMapBB and match the values defined for q3map_sun (or q3map_sunExt) in the corresponding shader of the environment box.
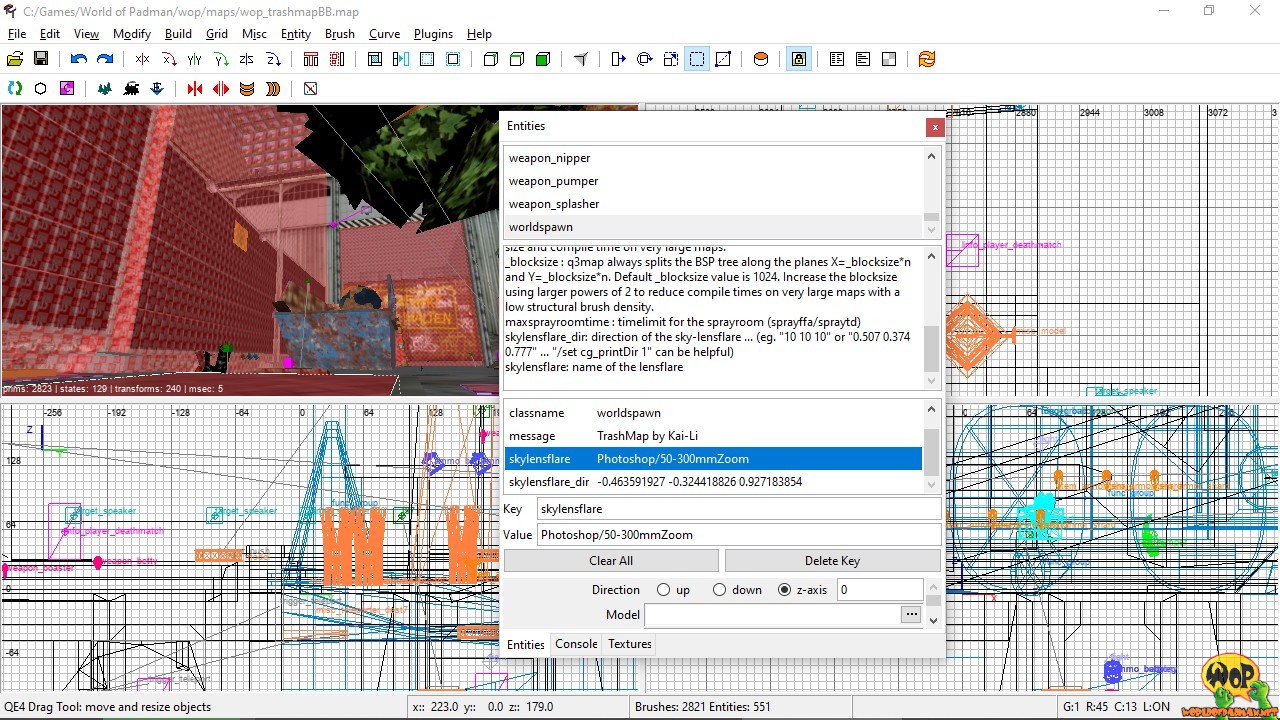
Worldspawn keys skylensflare and skylensflare_dir with values in the Entities Inspector of NetRadiants 1.5
For your map you only have to find out the correct values. The coordinates can be determined quite easily by the command cg_printDir 1 during in-game testing, provided you started your map with sv_pure 0 and devmap mymap. In the game, you only have to stand in the middle of the map, aim at the existing point light source (sun, etc.) and then transfer the vector coordinates as values for skylensflare_dir into the worldspawn.

Display of the vector coordinates of the player’s viewing direction by cg_printdir 1
If your environment box has no visible point light source (sun etc.) on the texture, you should proceed the other way around. Since the lens reflection effect Photoshop/50-300mmZoom automatically creates a bright point on the environment box that can be used as a sun, you should first define the polar coordinates of the point from which direct light will be emitted into the map. This means the specifications for q3map_sun (or q3map_sunExt) in the shader of the environment box. If you want to do without further math games now, you have to simply estimate by means of the shadow cast in your map and approach the actual position of the sun by testing to get q3map_sun (or q3map_sunExt) and skylensflare_dir on top of each other. But if you are familiar with trigonometric functions like sine and cosine, take a look at the next section.
Conversion from polar to vector coordinates
If by chance the polar coordinates of the q3map_sun (or q3map_sunExt) function are known from the shader of the environment box, the required vector coordinates for skylensflare_dir can be converted from the values of horizontal angle and elevation angle using the following equations:
X = SIN(elevation angle) x SIN(horizontal angle)
Y = COS(elevation angle) x COS(horizontal angle)
Z = SIN(elevation angle)
For a horizontal angle of 210° and an elevation angle of 68°, as in the BB version of the TrashMap, the following vector coordinates result:
X = SIN(68°) x SIN(210°) = -0,463591927
Y = COS(68°) x COS(210°) = -0,324418826
Z = SIN(68°)             =  0,927183854
These coordinates can then be transferred to the worldspawn. Please note the American spelling with decimal point instead of the comma!
skylensflare_dir -0.463591927 -0.324418826 0.927183854

Horizontal angle and elevation angle of the sun in the TrashMapBB