


In this tutorial I would like to show you how to install the level editor NetRadiant 1.5 on Windows and configure it for World of Padman. But before you start, you should make sure that you have installed World of Padman in the current version correctly. With older versions you might encounter errors when using this tutorial.
NetRadiant is based on the source code of GtkRadiant 1.5, and consistently continues its development. Aside from game packs for a number of other id-Tech3 based games, it also comes with a current version of the Q3Map2 compiler, which has also been further developed in terms of stability and bug fixing. The development of the NetRadiant is mainly driven by Team Xonotic and also receives support from the team behind Unvanquished. Meanwhile NetRadiant offers in my opinion more features and comfort than GtkRadiant. For fans of other Radiant-versions there are separate tutorials:
Download and extract
Earlier versions of NetRadent were compiled regularly by Ingar, who made the builds available through his project website. There you can still download old versions, as well as have a look at configuration notes and some valuable tutorials. In the meantime, illwieckz from the Unvanquished team has taken over this task and offers current builds not only for Windows operating systems on a new NetRadiant website. On the download page you can always find the latest builds for 32 and 64-bit operating systems. If you are no longer running Windows XP, the Windows 64-bit package should be right for you.
Since the NetRadiant does not have its own installation routine, you have to unpack the level editor into a folder of your choice. illwieckz usually offers zip archives which can be unpacked under Windows without any additional programs. To do so, you can right-click on the zip archive, select the option Extract all and unpack it into a folder of your choice.
Earlier versions were offered by Ingar partly as 7z archives. To unpack this, you need a program called 7-Zip, which you have to download and install additionally. Once this is done, you can also right-click on the 7z archive and select the option Extract files and unpack it into a folder of your choice.
It doesn’t matter if you choose the zip or 7z archive, both already contain a program folder for the level editor files, so you don’t have to create it yourself.
WoP Game Support
For the NetRadiant to work with World of Padman, you will need the archive files WoP radiant files.zip and WoP mapping files.zip we have prepared for you. Since WoP 1.5 they are already stored in the installation directory under XTRAS\editing files, so there is no extra download necessary any more. The files may receive some updates from time to time, but will always be included with the new WoP releases.
Note: Starting with illwieckz’s NetRadiant build “20200419”, almost the content of WoP radiant files.zip is already included by default. What is missing is the folder wop.bspc, which you will not need immediately in every case and can also be copied manually later if necessary. So you can ignore the first step described below and continue with the second step. If you want to work with an older version of the NetRadiant, you have to consider the first step here.
In the first step unpack WoP radiant files.zip directly into the installation folder of NetRadiant (here: C:\Users\Kai\Modding\Tools\NetRadiant-20150621-win32). Please note that the subdirectories in the archive must be unpacked correctly. The subdirectories games, wop.bspc and wop.game should then appear in your destination folder, as shown in the following figure.

WoP radiant files – archive content (right) and target folder (left)
In the second step unzip WoP mapping files.zip into your World of Padman installation directory (here: C:\Games\World of Padman). It will install a script and sample maps for the different game modes, which should make it easier for you to work on your own maps later on. Now you should find new subfolders like maps and scripts in your wop subfolder (here: C:\Games\World of Padman\wop). An accompanying readme file with further information in English is enclosed with the ZIP file. All map objects and environment boxes used by us (skyboxes) are already included in the WoP installation and no longer need to be installed separately. Related paths to work faster in NetRadiant can be found in the specially created catalogs.
Configuration
If you are upgrading from an older version of NetRadiant and encounter strange problems, it may be helpful to delete the directory (C:\Users\YourUserName\AppData\Roaming\NetRadiantSettings) with the existing NetRadiant settings first.
Now you can start the NetRadiant for the first time. In the displayed dialog Global Preferences you should now be able to select World of Padman in the drop-down list. I recommend you to enable the option Enable Logging and to disable the option Show Global Preferences, if you only want to create maps for World of Padman. If you keep the last option enabled, you will be able to decide by yourself on every start up of NetRadiant for which of the supported games you want to create a map.
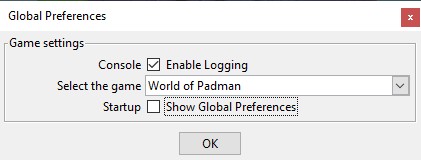
NetRadiant 1.5 – global preferences
If the correct path to the World of Padman installation can not be found at first attempt, you must manually specify it (here: C:\Games\World of Padman\wop). This is the folder where the wop.exe file is located. You can leave the other fields untouched.
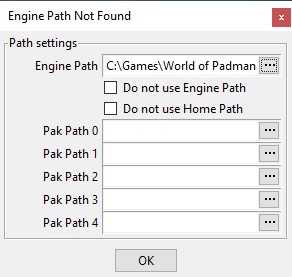
NetRadiant 1.5 – WoP engine path
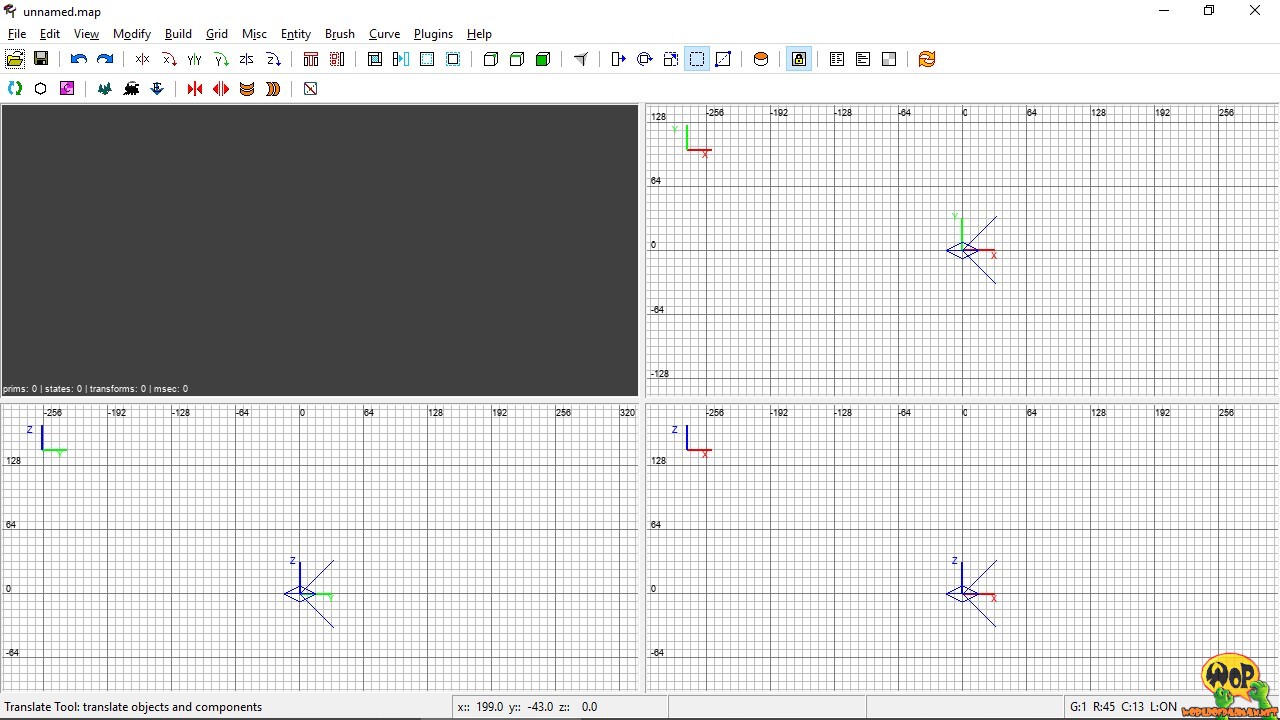
Now the NetRadiant should open normally with the default settings and look like shown in the following figure.
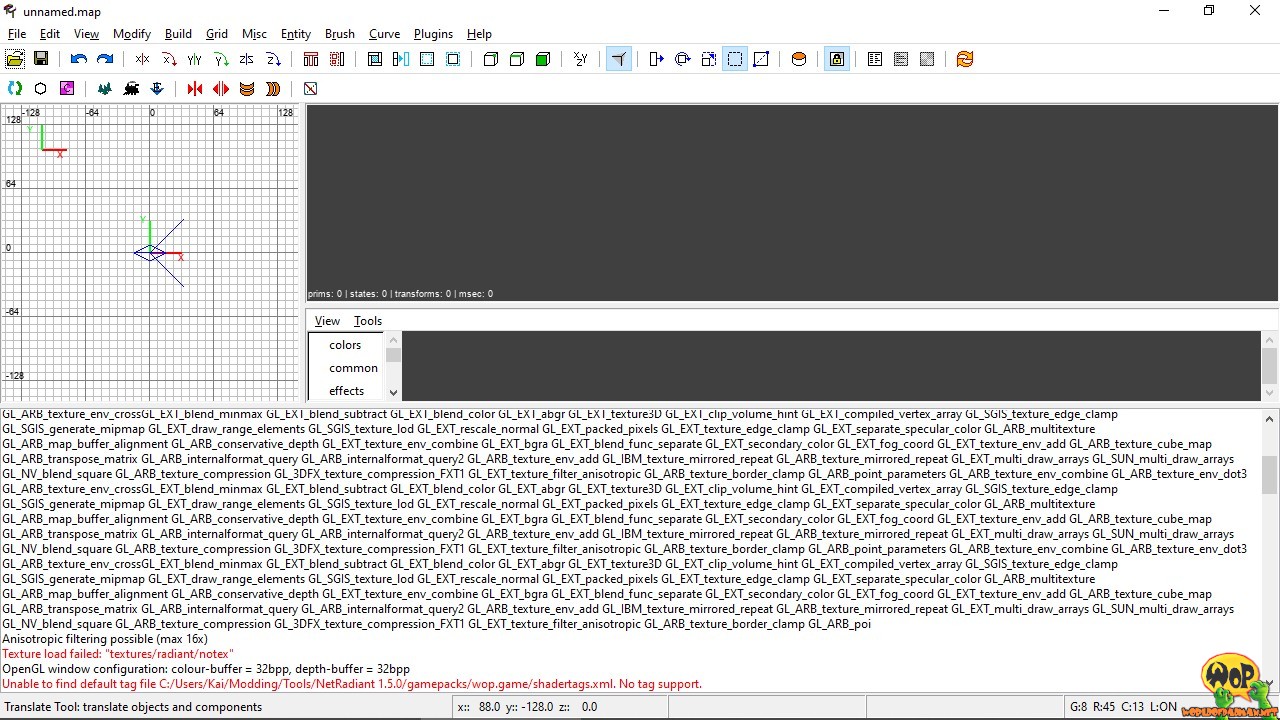
NetRadiant 1.5 – default layout
If you also face the error message Unable to find default tag file C:/Users/…/wop.game/shadertags.xml. No tag support. in the console, you can easily remove it by automatically generating a corresponding file via the main menu under Plugins > ShaderPlug > Create tag file.
Since the level editor is now set up correctly for World of Padman, you can make other settings as you wish in the main menu under Edit > Preferences…. If you are using the NetRadiant for the first time, I recommend the following settings:
- Interface > Layout: enable the third option of Windows Layout to activate the four-window layout.
- Display > Entities: enable the option Show Light Radii to visualize the light range of the light entities.
- Settings > Brush: enable the option Always use caulk for new brushes to apply the caulk texture on every new created brush by default.
- Settings > Grid: Set Default grid spacing to 1 to use a finer grid by default.
- Settings > Camera: disable the option Enable far-clip plane to see the complete map by default, if the level editor runs smoothly enough.
- Settings > Orthographic: enable the option Display size info to show by default the dimensions of the currently selected brush.
- Settings > Clipper: enable the option Clipper tool uses caulk to apply the caulk texture on every new created surface by default, while using the Clipper tools.
- Settings > Build: enable the option Enable Build Process Monitoring to see progress in the console while compiling the map from the build menu.
- Settings > Build: enable the option Stop compilation on leak to stop and cancel the compilation process automatically when a leak error is found.
- Settings > Texture Browser: Set the option Load Shaders at Startup to Common to preload at least the much-used common shaders at startup.
A restart of the editor is now necessary. After that, the editor should look like this.
NetRadiant 1.5 – four-window layout