


In this tutorial I want to show you what you need to get your map ready for the game mode Capture The Lolly. But before you start you should make sure that you have installed World of Padman version 1.5 or higher. Older versions do not support this game mode. I assume that you know what Capture The Lolly is and that you know how this game mode works.
It should be noted that we have included a sample map wop_mapCTL.map for the game mode Capture The Lolly in the WoP mapping files.zip file, which you can find in the folder /XTRAS/editing files of your WoP installation. This map is directly compilable and therefore fully testable with all components. Since we have not set any light entities, please compile without light. While you are working through this tutorial I recommend you to have a look at the example map from time to time.
General preliminary considerations
Since Capture The Lolly is a team-only game mode, there are some special aspects to the structure and layout of your map that you should take into account. It is recommended to build CTL maps in World of Padman symmetrically so that both teams have the same conditions. To achieve this with an asymmetrical layout is not impossible, but it is much more difficult. A special form to mention is the mirror-symmetrical layout, because the two halves of the map are not rotated but mirrored to each other. This can be interesting for the gameplay, but also confusing, because for example for one team it goes around to the right, where it goes around to the left for the other team. In any case, the advantage of a symmetrical layout for you is that you only have to build half of the map and then you can simply duplicate, copy and paste (!) again. But more about that later.
Since a red and a blue team are fighting each other in the map, it is a good idea to highlight the two halves of the map with accents in the corresponding team colors so that players can quickly orientate themselves at any time. At the very least, the respective bases with the lollipops should always be clearly assigned to the teams in terms of color. The routes to the lollipops within the bases and also between the bases themselves should always be provided with sufficient alternatives. The lollipop should be accessible by at least two, if not three routes. There should be at least three routes between the bases. This 2:3 or better 3:3 formula has proved to be very successful and anything less than that will quickly cause frustration for the players. The distances between the lollipops should be a good average and it should be impossible to fire directly from a base into the opponent’s base. This also depends on the type of map and the available items like weapons, powerups and holdables.
As a last point I would like to remind you of the limits of the Quake3 engine, which can be reached quite fast with CTL maps in Lilliput style due to the large and open areas. In addition to that there is the mostly much higher number of items, player models, dynamic graphic effects etc. which can quickly bring the number of polygons and items to the limit. Before you continue, the brushwork of the first half of your map should be finished. Remember that you will need to make corrections and changes on both sides of the map later, so I recommend you wait until you have finished the next steps.
Inserting the team spawn points
Before we get to the team spawn points, your map must have at least one info_player_intermission, to allow players to enter your map for the first time and to guarantee the Spectator a nice view of your map. Now to the spawn points for the respective teams, which are not only distinguished by the team color, but also by an additional feature.
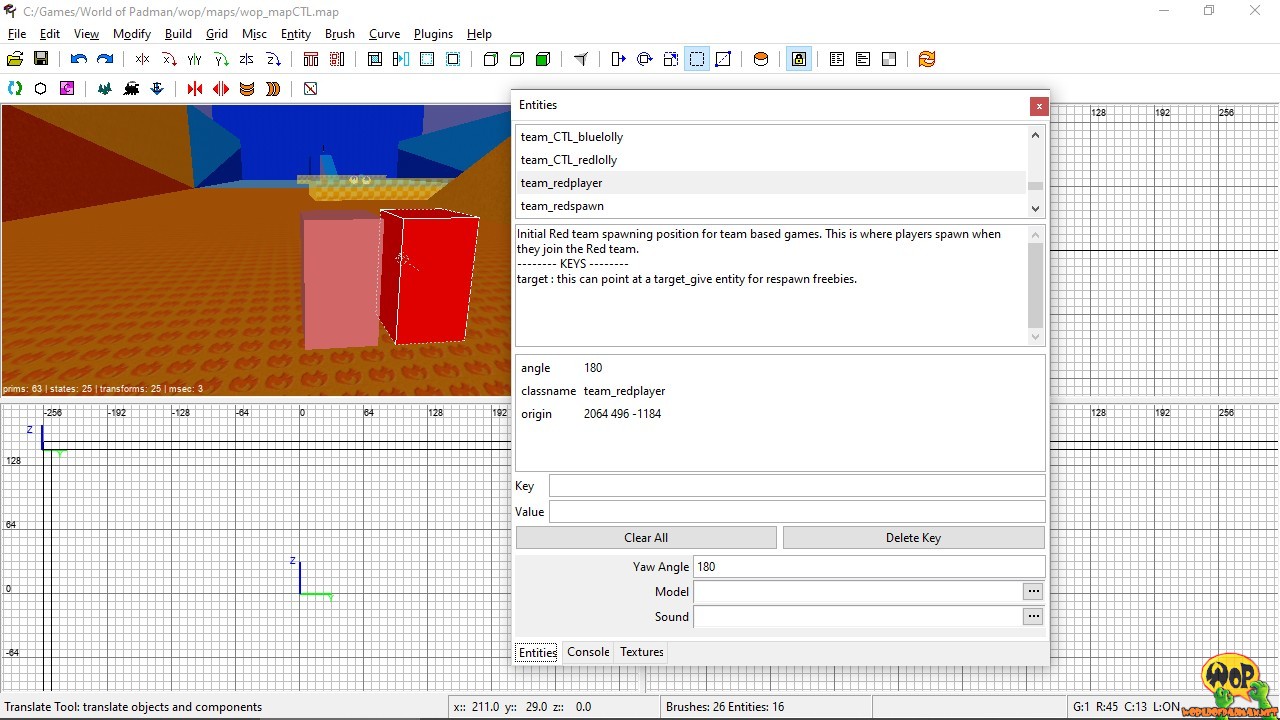
With the entity team_blueplayer or team_redplayer you define the spawn points in your map where a player enters your map for the first time in the chosen team color. This is only valid if the match starts or a new player is joining during the match. These spawn points should be located in a safe area further back in the base of the respective team, where the player can orientate himself and equip himself with some items.
Team spawn points in Capture The Lolly
With the entity team_bluespawn or team_redspawn you define the spawn points in your map, where a player re-enters the map after he has passed the first time. These re-spawn points can also be in the nearer vicinity of the lollipop or in the outer area of the base, where it can get hot. In no case should they be on the opposing side of the map.
If your base is not so large, the spawn and re-spawn points can also be grouped in pairs and placed next to each other. However, I recommend that you use at least eight of each type per team. You can find the entities in the context menu of the Radiant under /team, which you can access by right-clicking on it. The arrows on the entities show the direction of the player’s view when they appear and should therefore not point directly at a wall.
Inserting the lollipops and other items
Usually we build two lollipops into our maps, one for each team. Theoretically you could have more than one lollipop per team, but the HUD is only designed to display one lollipop per team. The entities team_CTL_bluelolly and team_CTL_redlolly can also be found in the Radiants context menu under /team, which you can call up by right-clicking. You should position them so that they are easily accessible from several directions and it is a good idea to emphasize the spawn point of the lollipops with a small platform or a special texture.

Context menu with team entities in NetRadiant 1.5
Other items should not be located directly in the vicinity of the lollipop spawn. The BOOMiES (mines) and BAMBAM (turret) holdables have been available since WoP 1.5 and are mainly intended for use in Capture The Lolly to increase tactical options in the game. The BAMBAM can have a big impact on the gameplay, so it should not appear too often and maybe only at a not so easily accessible place in the map. In general, compared to the Spray Your Color game mode, you should avoid adding the iMPERiUS as it would create too much imbalance between the teams. But technically it works. All other weapons can be placed further back in the base or further towards the middle of the map depending on their defensive or offensive effect. It might be practical to increase the ammunition supply in the respective entities of the weapons and ammunition bottles in the bases a bit and keep the re-spawn intervals short. The same applies to the Health Station, which may appear several times and sometimes appears twice in the bases of our maps.
Ban BAMBAM and BOOMiES
If a player tries to place the BAMBAM and BOOMiES holdables, which were introduced in WoP 1.5, on the map, he will find that this is not possible everywhere. To avoid particularly nasty situations, we have made sure that you cannot place the items on jump pads or at teleporter exits etc. However, this rule only applies within a certain radius around the corresponding spots.
In addition, there will be areas in your map where you may want to limit the use of these items, such as critical locations in your map or the bases of the respective teams. To give you as a level designer a little more control over this, we have introduced the trigger trigger_forbiddenitems. To use it, you need to create a brush in the appropriate area of your map that takes up the size of the forbidden zone. You assign the texture common/trigger to this brush. Afterwards you have to select the brush, right-click on it and set the property trigger_forbiddenitems in the context menu. Now you can check item_bambams (spawnflags 1), item_boomies (spawnflags 2) or both options (spawnflags 3) in the Entitiy Inspector to prevent the use of BAMBAM, BOOMiES or both items at the same time. Any player inside this brush will not be able to use these items according to your instructions.

trigger_forbiddenitems with key spawnflags 3
Creating the second half of the map
You may have noticed that “red” and “blue” often appear in the entities to distinguish the teams. You should take advantage of this and apply it to the names of your textures and shaders. You should create a blue and a red variant of these from the beginning, if it makes sense. Although Radiant offers many possibilities, e.g. using the Texture Browser and the Find/Replace function to quickly find and replace textures in selected brushes, I often proceed differently.
When one half of the map, for example for the blue team, is finished and tested, I save it twice. Once with “blue” and once with “red” in the name. Then I open the MAP file with “red” in the name in a text editor (e.g. Notepad++) and replace “blue” with “red” everywhere. Then I open the MAP file with “red” in the name and check, if everything is adjusted correctly and nothing was missed. Then I import the blue map into the red map or vice versa via the main menu under File/Import in the Radiant, rotate it, align it and save it under a new name. If there are duplicate entities like the info_player_intermission, I delete them manually afterwards. The advantage of this procedure is that serious corrections and necessary adjustments only have to be made on one half of the map and the process can be repeated very quickly.
If you want to double your half of the map directly in the Radiant, you should select the brushwork with the corresponding entities accordingly and copy it with the shortcuts Ctrl+C and paste it with Ctrl+V. This would mean that all entities would have to be duplicated in such a way that the correct assignment, for example between target and targetname, is also duplicated correctly. If you would simply duplicate the map half by pressing the space bar instead, the duplicated entities would be parts of the old entities and it would result in useless connections between both map halves. To correct this manually afterwards is not that easy. Nevertheless, you would have to manually assign the team entities in the new map half to the other team. For textures and shaders this can also be done quite fast via the Texture Broswer menu and the function Find/Replace in selected brushes.

Texture Browser with the Find/Replace function
Starting the map in Capture The Lolly
After you have compiled your map, you will surely want to test it. To enable WoP to start your map with all textures etc. outside a PK3 file, you have to set WoP to unpure first. To do this, open the console in WoP with the key combination Shift+Esc, enter /sv_pure 0 and confirm with the Enter key. If you have not yet included your map in the create menu, you must start it from the console as well. Before you do this, you must set the game mode to Capture The Lolly, otherwise your map will automatically start in the game mode Free For All. You do this by entering the command /g_gametype 6 in the console. Now you can start your map by entering /devmap myCTLmap in the console. You can also close the console at any time with the key combination Shift+Esc if necessary.
Briefly, all the console input is summarized once again.
/sv_pure 0
/g_gametype 6
/devmap myCTLmap