


In this tutorial I want to show you what you need to get your map ready for the game type Spray Your Color. But before you start you should make sure that you have installed the latest version of World of Padman. I’m assuming that you know what Spray Your Color is and know how this game type works in general. I have to warn you, because this tutorial will be a bit more extensive.
It should be noted that we have included sample maps for the game type Spray Your Color in the file WoP mapping files.zip, which you can find in the folder /XTRAS/editing files of your WoP installation. The file wop_mapSyC.map is directly compilable and therefore fully testable with all components. Since we have not set any light entities, please compile without the light stage. The file wop_mapSyC_onlytele.map contains only the components needed for Spray Your Color, spray room, kill room, teleporter, warp tunnel for outbound and return trip and all related entities. You can import these directly into your existing map. Except for a few adjustments, this should save you a lot of work. But to understand everything correctly, you should still work through this tutorial and take a look at the example maps at the same time.
General preliminary considerations
We ourselves only allow the game type Spray Your Color on maps that are in Lilliput style, because we think that they are particularly well suited for this in terms of gameplay. The large and open spaces of these maps make it possible to access the spray room teleporter from all sides or to jump into it from a higher ground. Normal sized maps rarely offer these advantages. However, this game type should not be taboo for this type of maps and it is up to you to decide what you want to do and how.
When it comes to weapons, powerups and holdables, you are relatively free to choose from here. However, the extremely powerful iMPERiUS should be neatly hidden and not so easily accessible. A spawn interval of 90 to 120 seconds should be maintained. Often there is a bottle of ammunition for the iMPERiUS in our maps. Like the weapon itself, this one should also be neatly hidden or placed in a location that is difficult to access. The holdables BOOMiES (mines) and BAMBAM (turret) have been available since WoP 1.5 and are mainly intended for use in Capture The Lolly to increase the tactical possibilities in the game. Both holdables therefore do not spawn in the game mode Spray Your Color!
Basically a map for the game type Spray Your Color consists of the following components:
- Main area: This is where the players fight their battles and collect the spray cartridges. The area can of course also consist of several rooms or sections.
- Spray room teleporter: This is the portal to the spray room, which players can only enter with collected spray cartridges in their luggage.
- Warp tunnel: This is a tunnel for the outbound and return trip between the main area and the spray room, through which the player is catapulted quite quickly.
- Spray room: This is where the two spray walls are, where players can spray their logos to score points.
- Kill room: This is a trap to remove campers from the spray room after a given time and send them to the afterlife.
What you should keep in mind when creating these components and beyond is described in detail in the following sections. As a prerequisite, your actual map should already have been created. An info_player_intermission guarantees the Spectator a nice view of the main area of your map and a few info_player_deathmatches allow the player to enter your map. Depending on the size of the map, you should distribute between 12 and 16 spawn points evenly in your map, if possible also some in higher levels, if your map has higher levels. You don’t need team spawn points for the FFA or Team version of Spray Your Color, unless you want the players in the team version to appear in separate places for each team. For more information on team spawn points, see the tutorial Create a map for Capture The Lolly.
Setting up the spray room teleporter
The location of the spray room teleporter must be well considered. It should be somewhat exposed and not necessarily placed directly on the bottom of the map. It should not be too easy, but also not too difficult to reach. In most maps, there are at least three entrances to the teleporter if it is in a separate area (e.g., in the oven in PadKitchen). Another very popular feature is the possibility to jump into the teleporter from somewhere above.

Colors and name of the spray room teleporters (Note: yellow appears green!)
The teleporter models are available in different colors and are located in the directory models/mapobjects/pad_teleporter/. They can be treated in principle like a normal map object, but must only be included using the misc_externalmodel entity. Using the misc_externalmodel entity means that the teleporter model is not included in the BSP file during compilation. This means that we are able to display the spray room teleporter in the maps only in the game type Spray Your Color. A disadvantage is that older versions of the GtkRadiant only show a misc_externalmodel as a small orange box and not the map object itself. In the Radiant, the center of this box also marks the base of the teleporter model and is therefore half-sunk in the brush below. To be able to position the teleporter model correctly in this case, there is a little trick. First insert the teleporter model via an entity misc_model and make all the desired settings in the Entities Inspector. Then select the entry classname and change the value in the value field from misc_model to misc_externalmodel. The NetRadiant, on the other hand, displays all misc_externalmodel correctly with the linked models, which is of course more convenient. Important is the input of the gametype key, which must be entered with the values spray and sptp (separated by a space). The teleporter will then only appear in the game types Spray Your Color and Spray Your Color Team. You can use the key angle to rotate the model around the z-axis if necessary.
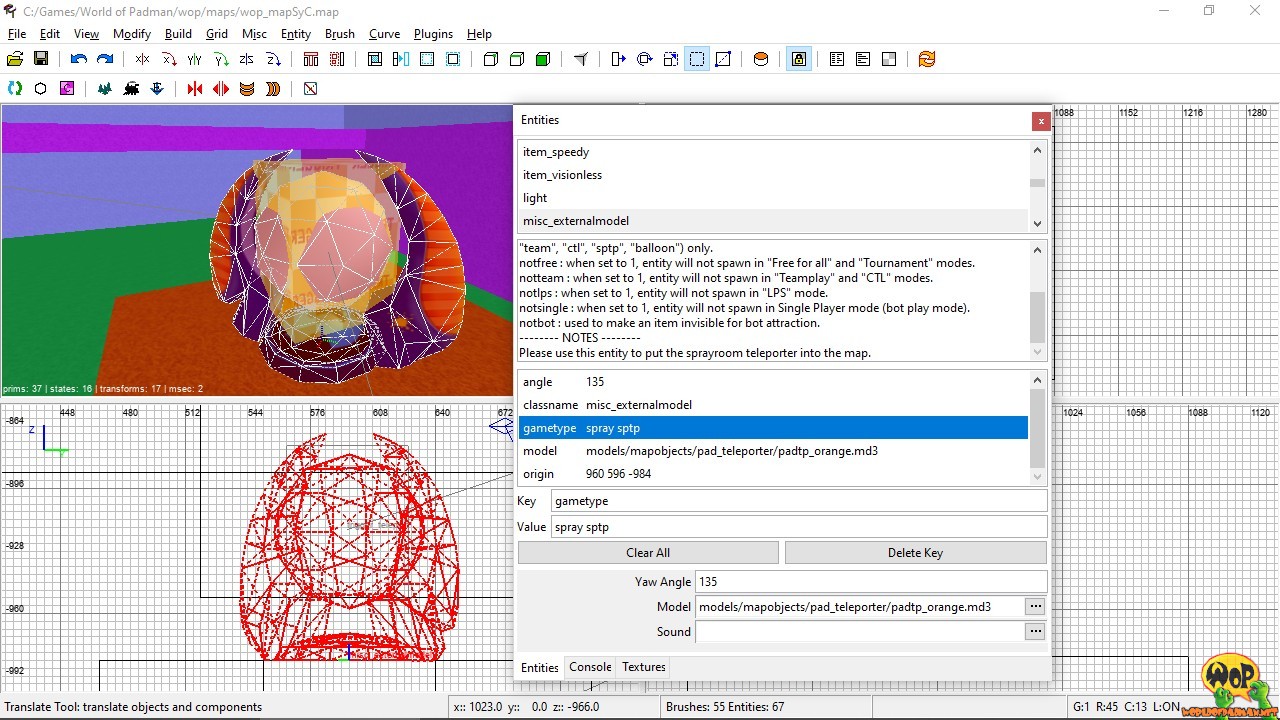
Embed spray room teleporter as misc_externalmodel
Above the misc_externalmodel entity, you create and align a new brush with the approximate dimensions of the teleporter model and assign the texture common/trigger to it entirely. Afterwards you have to select the brush, right-click on it and set the property trigger_teleport in the context menu. Finally, you have to link it to a misc_teleporter_dest, which is located at the beginning of the warp tunnel (see next section). You link both together by first selecting the trigger brush, then the misc_teleporter_dest entity, and then pressing Ctrl+K. The order is important and a line should now appear between the two. Every player who touches this brush later on will automatically end up in the warp tunnel. You have to select the spawn flag enter_sprayroom in the Entities Inspector (spawnflags 2), so that the engine knows that the player is moving towards the spray room due to the trigger brush. If you have problems in older versions of GtkRadiants to create and position the trigger brush in the correct size, you can also use misc_model to temporarily insert the teleporter model, align the trigger brush to it and then delete the model.

Access to the spray room via trigger_teleport and spawn flag enter_sprayroom
Creating the warp tunnel
The concept of the warp tunnel was introduced by ENTE in his map PadGarden for Quake 3 Arena. In World of Padman, this tunnel connects the main area of the map with the spray room and provides both the way in and out. In the following I will limit myself to the technical implementation for World of Padman, which seems to be quite complex. The design is entirely up to you, but you should come up with something special to make the flight through the tunnel an experience for the player. Just have a look at some warp tunnels in our maps.
Step 1: The basis for the tunnel is a 256 x 256 x 5000 units (width x height x length) large brush, which is hollowed out using the hollow function. After removing the overlapping of the created partial brushes, the tunnel should be 256 units wide and high inside and textured from the inside. Inside this tube, it is best to build a second tube of the same length in the same way, which should have an inner dimension of about 168 units and assign the texture common/clip to it completely. In the space between these two long tubes you can create your design, but it must not protrude into the inner player clip tube, so that it does not interfere with the player’s flight path. Mark the lower brush at the bottom of the inner tube again and assign the texture common/nodrop to it completely. This way, items such as weapons, powerups, holdables and spray cartridges cannot be left lying around in the tunnel, in case someone experiences a teleporter frag. Finally, create a brush thick enough to divide the two tubes into two equally long halves in the middle and assign the texture common/clip entirely to it. One half is now for the outward trip to the spray room and the other for the return trip.

Step 1: Creating the warp tunnel tubes
Step 2: All the components to be created now are located only inside the inner tunnel tube. The way there is from the beginning to the middle of the tunnel, so you place the misc_teleporter_dest entity of the spray room teleporter at the starting position (see previous section) and align the spawn direction of the player accordingly (see arrow in misc_teleporter_dest). Directly above the entity misc_teleporter_dest you now create a brush into which the player should be spawned. You assign the texture common/trigger to this brush entirely. Afterwards you have to select the brush and right-click on it and assign the property trigger_push to it using the context menu. The target of this trigger brush is a target_position, which is located very close to the upper brush of the inner tube and positioned approximately in the first quarter of the tunnel, between the beginning and middle of the tunnel. The further it is positioned towards the middle of the tunnel, the faster and more far the player flies through the tunnel later. You should test this out a bit later. You can connect the two together by first selecting the trigger brush, then the entity target_position and then pressing the key combination Ctrl+K. The order is important and a line should now appear between the two.

Step 2: Entry via misc_teleporter_dest, trigger_push and target_position
Step 3: To add a sound effect to this acceleration, you add an entity target_speaker to the outward tunnel, which is triggered by a separate trigger brush. To do this, place a brush in the tunnel that fills the cross section of the inner tube in the front part of the player’s trajectory as well as possible and give it entirely the texture common/trigger. After that you have to select the trigger brush and right-click it and assign the property trigger_multiple to it using the context menu. You can connect the two by first selecting the trigger brush, then the entity target_speaker and finally pressing the key combination Ctrl+K. The order is important and a line should now appear between the two. In the entity target_speaker the check mark activator should be set in the Entities Inspector (spawnflags 8). In the directory sound/world/ you will find three sound files, tunnel_01 to tunnel_03 which you can use here. The path for the key noise should look like this: sound/world/tunnel_03, but the file extension must be omitted.

Step 3: Sound effect through trigger_multiple and target_speaker
Step 4: Unfortunately, it cannot be ruled out that players will collide or otherwise be hindered in the warp tunnel. The result is usually a player who falls to the ground early before the middle of the tunnel. To avoid him having to walk the rest of the way to the tunnel exit and losing time unnecessarily, it is best to install an additional brush directly above the nodrop brush, which is a few units higher. This brush should cover about the whole length of the first half of the tunnel (outward path) and you should completely assign the texture common/trigger. Then you have to select the brush and assign the property trigger_push to it using the context menu with a right click. The target of this trigger brush is a target_position, which is quite close to the upper brush of the inner tube and at the end of the first half of the tunnel. You connect both by first selecting the trigger brush, then the entity target_position and finally pressing the key combination Ctrl+K. The order is important and a line should now appear between the two.
Step 5: Just before the player clip brush in the middle of the tunnel, you now position another brush that represents the end of the first half of the tunnel and closes the inner tunnel tube. This brush is assigned the texture common/trigger entirely. After that you have to select the brush, right-click on it and set the property trigger_teleport in the context menu and finally connect it to a misc_teleporter_dest, which is located directly in your spray room (see next section). You connect both by first selecting the trigger brush, then the entity target_position and finally pressing the key combination Ctrl+K. The order is important and a line should now appear between the two. Every player who touches this brush will automatically be taken to the spray room.

Step 4+5: Exit via trigger_teleport, and trigger_push and target_position in case of a fall
The tunnel half for the way between the main area of your map and the spray room is now finished. The player enters the spray room teleporter (trigger_teleport > misc_teleporter_dest) and enters the outbound half of the tunnel, is accelerated in the direction of the view (trigger_push > target_position), triggers a sound (trigger_multiple > target_speaker) and lands at the exit in the middle of the tunnel (trigger_teleport > misc_teleporter_dest) and leaves it in the direction of the spray room. Should this fail, an additional trigger brush on the ground ensures a fast push to the tunnel exit in case of unintentional ground contact (trigger_push > target_position). In the case of a teleporter frag, an additional nodrop brush on the ground removes items that the player would otherwise unintentionally leave there.
Step 6: The second half of the tunnel for the way back from the spray room to the main area of your map is basically the same as the first half. You have to imagine the whole setup as mirrored at the tunnel center. This means that only the direction of flight in the tunnel changes by 180°, so this time the player flies from the other side of the tunnel to the middle of the tunnel. The only difference is that the trigger_teleport in the middle of the tunnel, which releases the player back into the main area of the map, gets at least six misc_teleporter_dest assigned by giving them all the same value for targetname. Make sure that these are distributed in appropriate locations in the map, and not too close to the spray room teleporter. Camping at these locations by other players is prevented or at least made pointless by the player from the spray room randomly appearing at one of these six spawn points.

Step 6: Setup of the tunnel half for the way back is analogous to the outbound path.
If you now get the idea to create the second half of the tunnel quickly by simply duplicating and rotating the first half of the tunnel, you should select the brushwork with the corresponding entities accordingly and copy it with the shortcuts Ctrl+C and paste it with Ctrl+V. This way all entities would have to be duplicated in a way that the correct assignment for example between target and targetname is also duplicated correctly. If instead you would simply clone the tunnel half by pressing the space bar, the cloned entities would be parts of the old entities and it would result in nonsensical links between both tunnel halves. To correct this manually afterwards is not that easy.
The design of the warp tunnel described here has proven to be very practical in our maps. Nevertheless, such a tunnel can also be implemented differently. In the TashMap, for example, the warp tunnel was integrated directly into the spray room. The two halves for the outbound and return routes are not arranged one behind the other, but parallel. The tunnel construction was thus reduced to the inner tube and the spray room itself represents the outer shell and at the same time the design of the warp tunnel. So there are no limits to your creativity.
Creating the spray room
The spray room should form the visual heart of your map. It is the room where players enter to score points, so honor this moment with an elaborate design. The size of the walk-in area in the spray room should not exceed approximately 768 x 768 x 1200 units. This does not mean that you cannot make the spray room itself bigger. For example, ENTE has built a much larger spray room (rocket silo) in the PadGarden, only the walk-in area has the dimensions given above. As an entry point for the player to the spray room you need the misc_teleport_dest, which is connected to the trigger_teleport from the outward part of the warp tunnel (see previous section). Once inside, the player should be able to get directly to the two spray walls without much obstruction or detours. Especially for the team mode of Spray Your Color, the spray walls must be able to be quickly allocated to the team colors red and blue, so a directly visible coloring of the spray walls themselves is of great advantage.
In order for the player to spray his logo and also score points, an additional brush is required, which should be about 4 units thick and cover exactly the sprayable area of the spray wall. You assign the texture common/calk entirely to this brush. Then you have to select the brush and right-click on it to set the property func_static using the context menu. You can define the team allocation of each spray wall with the key spraywall, with the value 1 (red team) or 2 (blue team).
- spraywall 1: Creates a spray wall for the red team
- spraywall 2: Creates a spray wall for the blue team

Create spray wall per team via func_static and key spraywall
The last component is the exit portal from the spray room. To do this, create a sufficiently large brush between the two spray walls or where the exit should be, and assign the texture common/trigger entirely to it. Then you have to select the brush, right-click on it and assign the property trigger_teleport using the context menu and finally connect it to the misc_teleporter_dest in the return part of the warp tunnel. You can connect both by first selecting the trigger brush, then the entity misc_teleporter_dest and finally pressing the key combination Ctrl+K. The order is important and a line should now appear between the two. Every player who touches this brush will automatically return to the main area of your map. To do this, you have to check the spawn flag leave_sprayroom in the Entities Inspector (spawnflags 4), so that the engine knows that the player has left the spray room again and exchanges the spray gun for the player’s weapons and items.
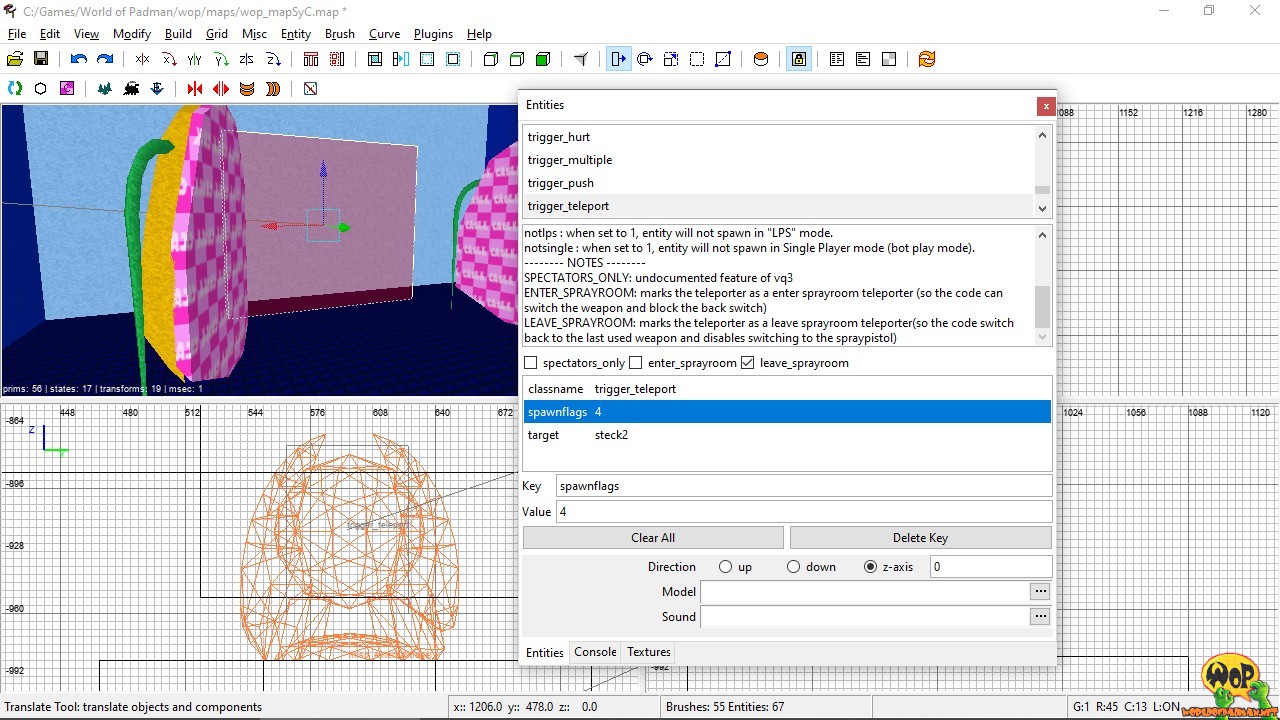
Leave spray room via trigger_teleport and spawn flag leave_sprayroom
Creating the kill room
The kill room is a very important feature to hopefully light a fire under the butt of the unteachable campers in the spray room. Think about a suitable trap or device for this. We don’t want to limit your creativity. If you can’t think of anything, you can also just have a look at some of the kill rooms in our maps. If the kill room itself is built, you can place a misc_sprayroomtl_teleporter at a suitable place. This will be the spawn point for the most persistent spray room visitors. By default, the player will remain in the spray room for 30 seconds before teleporting to the kill room. You can change this value by entering the key maxsprayroomtime in the worldspawn of your map and define your own value by entering a number for the seconds, e.g. 40.
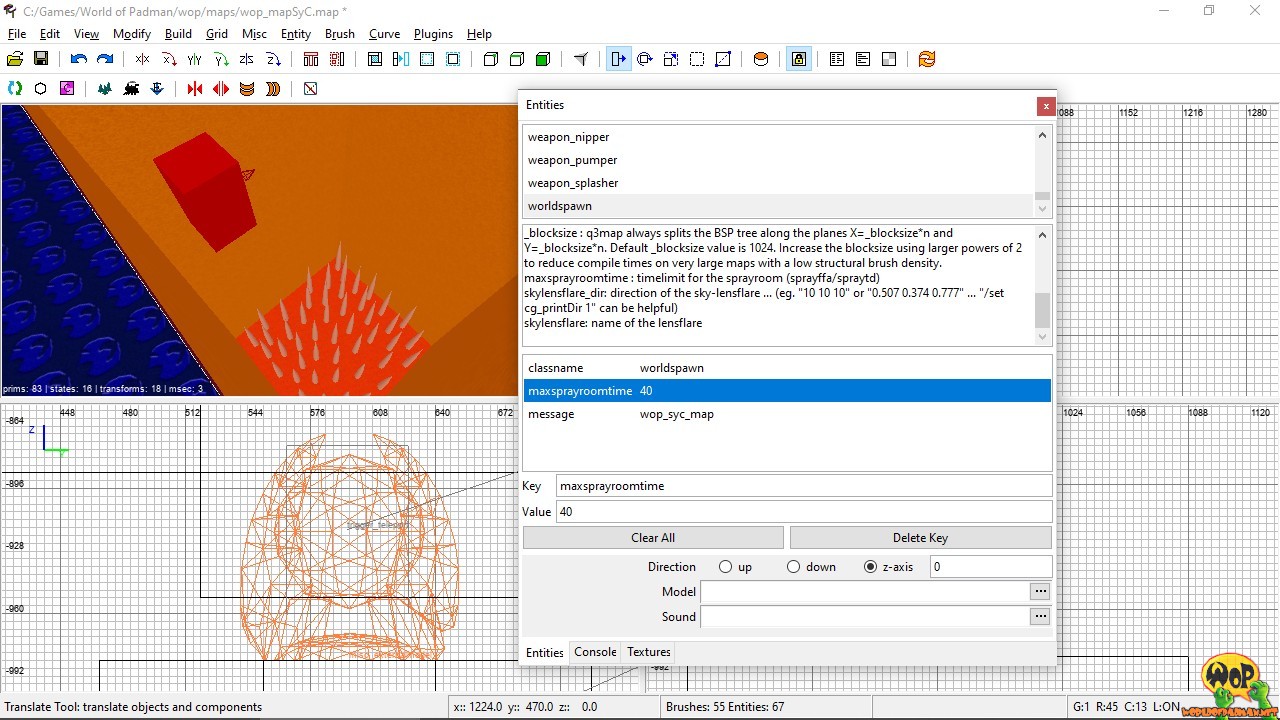
Define the dwell time in the spray room yourself using key maxsprayroomtime
You have successfully created all components for a SYC map. So you can see that the concept behind it is quite extensive and took some time to implement. Therefore it is best to import our example map wop_mapSyC_onlytele.map via the main menu under File/Import.
Start a map in Spray Your Color
After you have compiled your map, you will surely want to test it. To enable WoP to start your map with all textures etc. outside a PK3 file, you have to set WoP to unpure first. To do this, open the console in WoP with the key combination Shift+Esc, enter /sv_pure 0 and confirm with the Enter key. If you have not yet placed your map in the create menu, you must also start it from the console. Before you do this, you must set the game type to Spray Your Color, otherwise your map will automatically start in Free For All game type. You can do this by entering the command /g_gametype 2 in the console if you want to start the FFA mode of SYC. For the team mode of SYC you have to enter /g_gametype 7. Now you can start your map by entering /devmap mySYCmap in the console. You can always close the console with the key combination Shift+Esc if necessary.
Briefly, all the console input is summarized once again.
/sv_pure 0
/g_gametype 2 (or 7)
/devmap mySYCmap